Visual Studio error for docker-compose project: Value can not be null

If you get this error when compiling a solution containing a docker-compose project, check if there are any Azure Function projects with docker support which were created with function cli
Error: Value can not be null. Parameter name: stream
Removing these projects would make the error go away. Apparently Visual Studio does not support class library type docker projects, which is essentially what a function project is.
Severity Code Description Project File Line Suppression State
Error Value cannot be null.
Parameter name: stream docker-compose C:\Program Files (x86)\Microsoft Visual Studio\2017\Enterprise\MSBuild\Sdks\Microsoft.Docker.Sdk\build\Microsoft.VisualStudio.Docker.Compose.targets 291
AI: Process was called on the TelemetrySink after it was disposed, the telemetry data was dropped Error
When using Application Insights, if you ever get the issue AI: Process was called on the TelemetrySink after it was disposed, the telemetry data was dropped, check that you are not disposing the TelemetryConfiguration Object.
var config = new TelemetryConfiguration(applicationInsightsResolver.ResolveApplicationInsightsKey());
this.telemetryClient = new TelemetryClient(config);
Do not dispose config and you should be ok.
FunctionsStartup does not get hit when running Azure Function v2
When developing Azure Functions on dot net core (2.1), you can use Dependency Injection by Creating a Startup Class inheriting from FunctionStartup and overriding Configure(IFunctionsHostBuilder builder) method.
If you notice that the dependecies are not getting resolved and on debugging the Startup file is never invoked, check the Microsoft.NET.SdkFunctions nuget package is installed with Version > 1.0.27
SharePoint Permission Analyzer Available now
SharePoint Permission Analyzer is a handy Windows application that will scan through a site collection and create a permission structure of the site.
I created it to be able to quickly find out who had permissions on what, from a centralized place, and be able to save that report for comparison with the site on a later date.
The application can actually drill down to individual list item/document levels for unique permissions, although its much quicker to first load just the site structure and the load individual container level permissions where actually required.
Every report that you run will be automatically saved and can be opened later using Load Report.
Link to codeplex project https://sppermissionanalyzer.codeplex.com/
Installing Project Server 2013 SDK & Microsoft Document Explorer
So I was trying to install MS Project 2013 SDK. Straightaway I got the ‘Prerequisite for SDK setup’ prompt:
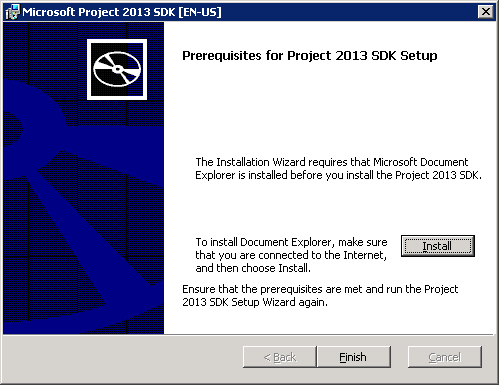
Unfortunately the server is not connected to internet so I could not download Document Explorer straightaway. After much hunting around and still none the wiser as to where to download this from, I finally managed to get the link to download.
Here’s hoping it saves someone else the trouble to search for Document Explorer download. Microsoft Document Explorer Download link: http://download.microsoft.com/download/4/5/a/45ad7fee-5bc6-4020-b2dd-fbdcaef3a41f/dexplore.exe
Once installed, SDK installation works a treat.
SharePoint 2010 Publishing Portal – Missing Quick Launch
When you create a new site collection from Publishing Portal, you will find yourself with a homepage with no quick launch. Thankfully it’s easy to fix, if you want it so.
Here is how the default page looks in a new site.

As a first step, change the page layout to something more appropriate. Edit the page and change Page layout to Welcome Page with web parts

This gets the Quick launch back in action. However, it still renders partially, with Recycle Bin and View all site contents links missing.

On publishing portals, styles defined in “page-layouts-21.css” determine the visibility of these links. Create a new css file with the text below and upload to the site collections Style Library.
<pre>.s4-specialNavLinkList
{
display: block;
}
Under master page settings, specify this file to be used as the Alternate CSS Url.
And that’s it all done, with the quick launch back in its entirety.

If you want a quick fix, simply open the page-layouts-21.css in designer and search for s4-specialNavLinkList.
Change
</pre>
.s4-specialNavLinkList
{
display: none;
}
<pre>
To
</pre>
<pre>.s4-specialNavLinkList
{
display: block;
}
<pre>
Keep in mind that this will unghost your css for that site. For a cleaner solution, use the Alternate CSS method.
SharePoint user impersonation with SPUserToken
This one is an extremely simple thing.
SPUserToken is frequently used with with RunWithElevatedPriviliges to open a site with System Accout Token.
Provided your code is running under System Account (or able to elevate privileges to System Account using SPSecurity.RunWithElevatedPrivileges), SPUserToken can be also be used to impersonate any site user. The most common use I can think of is creating a list item in another user’s name (or delegating control to someone else to do updates on your behalf).
The trick is to open a fresh set of SP Objects (SPSite, SPWeb, SPList … you get the gist) and use them instead of any lingering references you might have. Obviously, do remember to dispose of them once done.
Enough said…
public static void ImpersonationDemo(string SiteUrl)
 {
 // This could be inside SPSecurity.RunWithElevatedPrivileges
 // if you need to raise permissions initially
 using (SPSite site = new SPSite(SiteUrl))
 {
 using (SPWeb web = site.RootWeb)
 {
 // Add a new list item by User 1
 Impersonate("Domain\\User1", web);

// Add a new list item by User 2
 Impersonate("Domain\\User2", web);
 }
 }
 }

public static void Impersonate(string LoginID, SPWeb Web)
 {
 // Get User Token for the user we are trying to impersonate
 SPUserToken token = Web.AllUsers[LoginID].UserToken;

// IMPORTANT - Open a new site using this token
 using (SPSite site = new SPSite(Web.Site.ID, token))
 {
 using (SPWeb w = site.RootWeb)
 {
 SPList Announcement = w.Lists["Anouncements"];
 SPListItem Item = Announcement.AddItem();
 Item["Title"] = "Test";
 Item.Update();
 }
 }
 }
File Checkout Issue: The file ‘path/file’ is not checked out
When you try to check out a file in document library, the operation fails with error “The file ‘path/file’ is not checked out”.

Generally the error is with [short term] file locks and can be resolved with the steps below. There are also other scenarios where this might happen, see following section
File Locked Out
- Check if the file is not checked out to any user
- Open the site in SharePoint designer, and navigate to your document.
- 9 times out of 10 you will see a lock symbol against the document, implying a document lock, even when the file is not checked out.

- Right click the document, click properties and select Summary tab. You will get the name of the user against whom the file is locked under Checked out by.
- Get hold of the person mentioned above. The actions below need to be done by that user on their machine.
- If the file is still open, close it down.
- Navigate to the site and try to check out the file.
- Open the file from site and close it
- Navigate to the site and discard the checkout
- Hopefully this should release the file lock. You can verify this by refreshing your site in SharePoint designer and the lock should have gone away.
Version Limit Exceeded
SharePoint has a way of coming up with incorrect error messages. I have seen the same error message on file checkout even when the file was not locked out to anyone.
Just on a hunch, I disabled ‘Require documents to be checked out’ under Document Library Versioning Settings and tried again. This time the correct error message J

This makes complete sense, for a change! SharePoint supports only 511 minor versions, and the document in question had 511 minor versions already.
Unfortunately deleting older versions won’t help; apparently, because SharePoint does not re-order existing version numbers, and the next version number would still end up being 512, which falls outside the limit.
Your only solution in this case is to publish a major version.
SharePoint Document Checkout Issue – This document could not be checked out. The file could not be checked in.
I ran into a wee issue a few days back. On a fresh SharePoint 2010 farm, created a site and uploaded a few documents. Everything was working fine on my development server.
However when I sent the link to a few colleagues to test, they reported facing issues checking out, opening and generally editing documents from their browsers. On trying to checkout a file for editing, they were getting the error prompt stating permission or lock issues. Verified this wasn’t the case.

Then I tried to check out the same file from development server and check it in back in after editing from a desktop machine. Didn’t work for me either (and I was a farm admin!). The error this time was more confounding

After an hour of head scratching, turns out the fix is fairly straightforward. Just create a site collection on the root of the web application. Once you do, everything works as it should. Delete it and you will see the same issues.
Microsoft should definitely document this somewhere (I haven’t located it anywhere so far).
Upgrading from SharePoint 2007 to Multi tenant 2010 farm
Firstly, possibly one of the best resources explaining SharePoint 2010 Multi tenancy features
http://www.harbar.net/articles/sp2010mt1.aspx
In the multi-tenant farm, each tenant has one subscription. The subscription is used to partition the service application so each units data is isolated. When a new site collection is created, its aligned to a subscription ID so it is aware which partition of the service application to use (for example when using search and doing an All Sites Scope search, results will only be returned from the current tenant’s sites).
If you are migrating from a SharePoint 2007 farm to a SharePoint 2010 farm with Multi tenancy, you would want your sites to be migrated to your subscription in the new farm.
I knew this must not be a big deal but I wasnt able to find a concrete document or link that told me how exactly the migration would work in this case.
Turns out its actually easier than it looks- Migration from 2007 to 2010 happens in the usual way (hybrid, in place, detach-upgrade – your choice) and then (and this is the key part), you align the sites to your subscription using PowerShell command
$subid = Get-SPSiteSubcription <GUID_OF_SUBSCRIPTION>
 $site = Get-SPSite "http://siteurl"
 Set-SPSite -Identity $site -SiteSubscription $subid
Thanks a tonne Spence.
